Spring Security - #3.로그인 (세션 → JWT) / 비즈니스 로직과 인증,인가의 분리
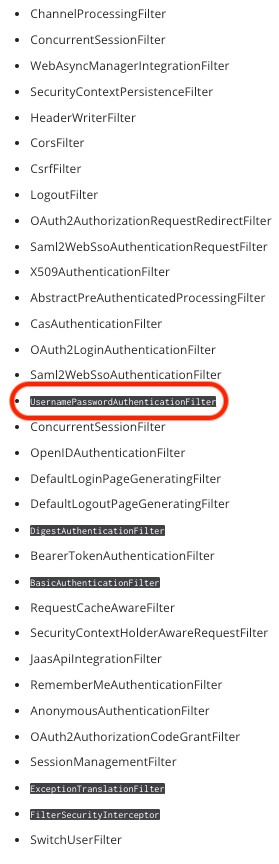
Security Filter 순서
login.html 수정
<!DOCTYPE html>
<html lang="en" xmlns="http://www.w3.org/1999/xhtml" xmlns:th="http://www.thymeleaf.org">
<head>
    <meta charset="UTF-8">
    <meta name="viewport"
          content="width=device-width, user-scalable=no, initial-scale=1.0, maximum-scale=1.0, minimum-scale=1.0">
    <meta http-equiv="X-UA-Compatible" content="ie=edge">
    <link rel="preconnect" href="https://fonts.gstatic.com">
    <link rel="stylesheet" type="text/css" href="/css/style.css">
    <script src="https://code.jquery.com/jquery-3.7.0.min.js"
            integrity="sha256-2Pmvv0kuTBOenSvLm6bvfBSSHrUJ+3A7x6P5Ebd07/g=" crossorigin="anonymous"></script>
    <script src="https://cdn.jsdelivr.net/npm/js-cookie@3.0.5/dist/js.cookie.min.js"></script>
    <meta charset="UTF-8">
    <title>로그인 페이지</title>
</head>
<body>
<div id="login-form">
    <div id="login-title">Log into Select Shop</div>
    <br>
    <br>
    <button id="login-id-btn" onclick="location.href='/api/user/signup'">
        회원 가입하기
    </button>
    <div>
        <div class="login-id-label">아이디</div>
        <input type="text" name="username" id="username" class="login-input-box">

        <div class="login-id-label">비밀번호</div>
        <input type="password" name="password" id="password" class="login-input-box">

        <button id="login-id-submit" onclick="onLogin()">로그인</button>
    </div>
    <div id="login-failed" style="display: none" class="alert alert-danger" role="alert">로그인에 실패하였습니다.</div>
</div>
</body>
<script>
    $(document).ready(function () {
        // 토큰 삭제
        Cookies.remove('Authorization', {path: '/'});
    });

    const host = 'http://' + window.location.host;

    const href = location.href;
    const queryString = href.substring(href.indexOf("?")+1)
    if (queryString === 'error') {
        const errorDiv = document.getElementById('login-failed');
        errorDiv.style.display = 'block';
    }

    function onLogin() {
        let username = $('#username').val();
        let password = $('#password').val();

        $.ajax({
            type: "POST",
            url: `/api/user/login`,
            contentType: "application/json",
            data: JSON.stringify({username: username, password: password}),
        })
            .done(function (res, status, xhr) {
                window.location.href = host;
            })
            .fail(function (xhr, textStatus, errorThrown) {
                console.log('statusCode: ' + xhr.status);
                window.location.href = host + '/api/user/login-page?error'
            });
    }
</script>
</html>
JWT를 적용한 Filter 만들기
JwtAuthenticationFilter

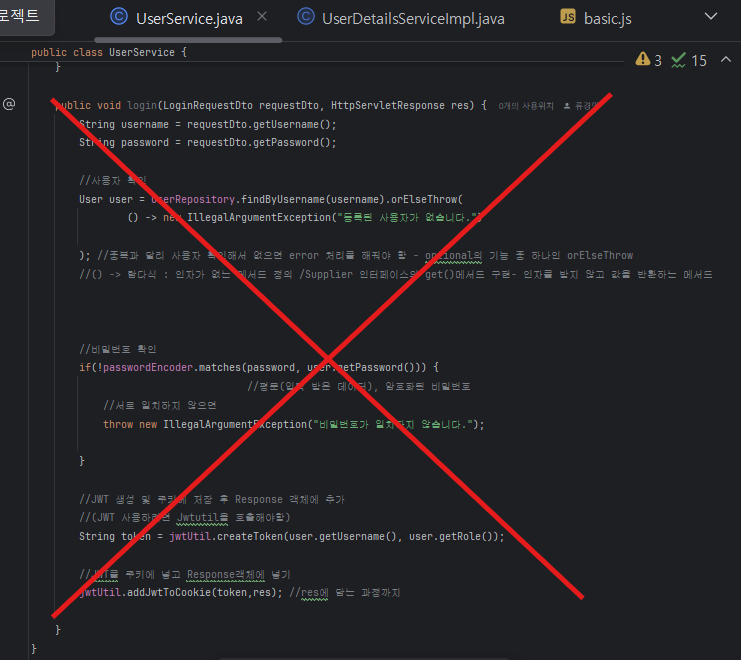
이전에는 로그인 처리를 하고 JWT 생성해서 반환하는 것을 컨트롤러/ 서비스/Repository 단에서 했었음
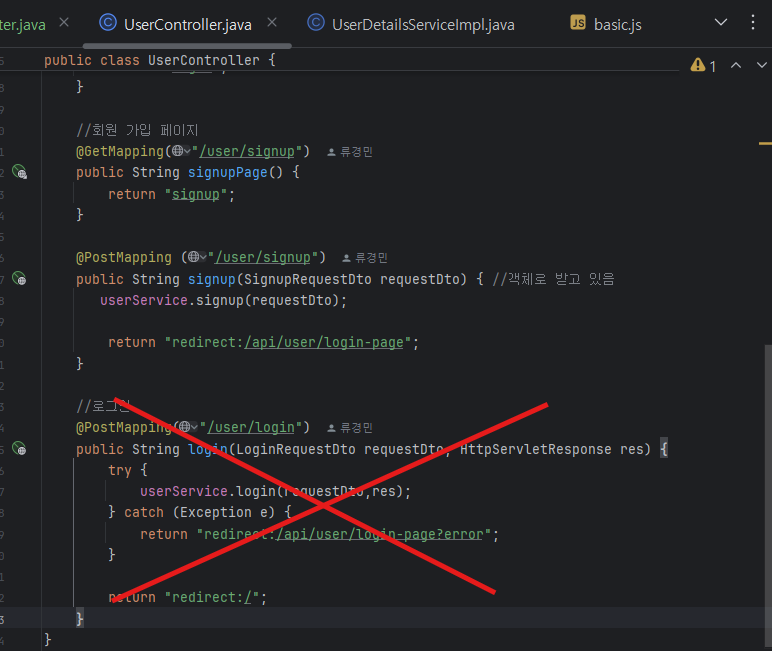
이전 UserController
//로그인
@PostMapping("/user/login")
public String login(LoginRequestDto requestDto, HttpServletResponse res) {
    try {
        userService.login(requestDto,res);
    } catch (Exception e) {
        return "redirect:/api/user/login-page?error";
    }

    return "redirect:/";
}
근데 이제 Filter을 배웠으니 인증/인가와 비즈니스 로직 처리를 분리해야 함
이후 UserController
: UserController에서 로그인 구현하지 않음
AuthenticationFilter(인증)
JwtAuthenticationFilter
메서드 별 설명
첫번째 메서드
//로그인 시도하는 메서드
@Override
public Authentication attemptAuthentication(HttpServletRequest request, HttpServletResponse response) throws AuthenticationException {
log.info("로그인 시도");
try {
LoginRequestDto requestDto = new ObjectMapper().readValue(request.getInputStream(), LoginRequestDto.class);
//request.getInputStream() = Request 요청 Body 부분에 username과 password가 넘어올 것임 JSON 형식으로
//.getInputStream() = 데이터 가져오기
//두번째 파라메터 : 변환할 Object 타입
//검증, 인증 처리하는 메서드 .authenticate() -토큰을 넣어줘야 함
return getAuthenticationManager().authenticate( //상속 받아서 사용할 수 있음
//토큰 만들기
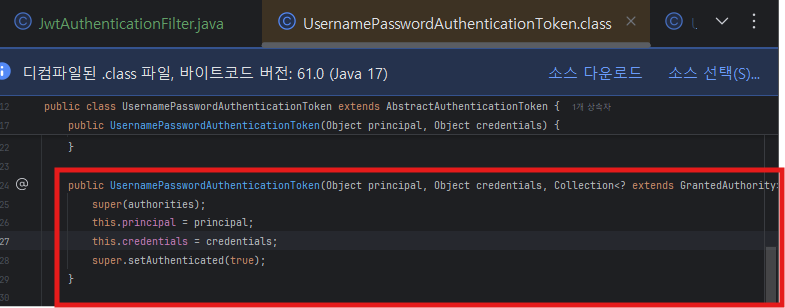
new UsernamePasswordAuthenticationToken(
requestDto.getUsername(), //첫번째 값
requestDto.getPassword(), //두번째 값
null //권한 쪽은 null
)
);
} catch (IOException e) {
log.error(e.getMessage());
throw new RuntimeException(e.getMessage());
}
}LoginRequestDto requestDto = new ObjectMapper().readValue(request.getInputStream(), LoginRequestDto.class);
ObjectMapper().readValue(변환할 파라메터 ,변환할 타입); : Json 형태의 String Value를 Object로 만드는 것
//검증, 인증 처리하는 메서드 .authenticate() -토큰을 넣어줘야 함
return getAuthenticationManager().authenticate( //상속 받아서 사용할 수 있음
        //토큰 만들기
        new UsernamePasswordAuthenticationToken(
                requestDto.getUsername(), //첫번째 값
                requestDto.getPassword(), //두번째 값
                null //권한 쪽은 null
        )
);
여기서 UsernamePasswordAuthenticationToken
두번째 메소드
//로그인을 성공하고 수행되는 두번째 메소드
@Override
//Authentication authResult : Authentication 객체를 파라메터 받아옴 -> 이 안에는 UserDetails가 들어있음 -> 그 안에 UserDetailsImpl가 들어있음
//UserDetails와 UserDetailsService를 Authentication Manager이 사용
protected void successfulAuthentication(HttpServletRequest request, HttpServletResponse response, FilterChain chain, Authentication authResult) throws IOException, ServletException {
    log.info("로그인 성공 및 JWT 생성");
    String username = ((UserDetailsImpl) authResult.getPrincipal()).getUsername(); //(UserDetailsImpl) authResult.getPrincipal() = @AuthenticationPrinciple
    UserRoleEnum role = ((UserDetailsImpl) authResult.getPrincipal()).getUser().getRole(); //토큰 생성시 두번째 파라메터에 넣어주기 위함


    //토큰 만들기
    String token = jwtUtil.createToken(username, role);

    //Cookie 생성하고 Response 객체에 넣어주는 메서드 실행
    jwtUtil.addJwtToCookie(token, response);

}
.getPrincipal() = @AuthenticationPrinciple
왜 Authentication을 UserDetailsImpl로 형변환해줘야 하는가?
UserDetailsImpl이 UserDetails 인터페이스를 구현한 클래스이기 때문 -> 실제 사용자 정보를 제공하는 역할
형변환 하지 않으면 Autehtication은 기본적인 UserDetails 인터페이스로만 접근할 수 있어, 구체적인 사용자 정보를 확인할 수 없음
전체 코드
package com.sparta.springauth.jwt;

import com.fasterxml.jackson.databind.ObjectMapper;
import com.sparta.springauth.dto.LoginRequestDto;
import com.sparta.springauth.entity.UserRoleEnum;
import com.sparta.springauth.security.UserDetailsImpl;
import jakarta.servlet.FilterChain;
import jakarta.servlet.ServletException;
import jakarta.servlet.http.HttpServletRequest;
import jakarta.servlet.http.HttpServletResponse;
import lombok.extern.slf4j.Slf4j;
import org.springframework.security.authentication.UsernamePasswordAuthenticationToken;
import org.springframework.security.core.Authentication;
import org.springframework.security.core.AuthenticationException;
import org.springframework.security.web.authentication.UsernamePasswordAuthenticationFilter;

import java.io.IOException;

@Slf4j(topic = "로그인 및 JWT 생성")
public class JwtAuthenticationFilter extends UsernamePasswordAuthenticationFilter {
    //UsernamePasswordAuthenticationFilter에 있는 기능 사용 위해 상속
    //직접하는 이유 : Session이 아니라 JWT를 해야해서

   //로그인 성공하면 JWT생성까지 할 것임 이에 필요한 jwtUtil 주입
    private final JwtUtil jwtUtil;

    public JwtAuthenticationFilter(JwtUtil jwtUtil) {
        this.jwtUtil = jwtUtil;
        setFilterProcessesUrl("/api/user/login"); //UsernamePasswordAuthenticationFilter의 메소드
                            //우리가 지정한 post방식의 로그인 url (custom 위해 WebSecurityconfig에서 해줬던 설정 여기에)
    }

    //로그인 시도하는 메서드
    @Override
    public Authentication attemptAuthentication(HttpServletRequest request, HttpServletResponse response) throws AuthenticationException {
        log.info("로그인 시도");
        try {
            LoginRequestDto requestDto = new ObjectMapper().readValue(request.getInputStream(), LoginRequestDto.class);
                                                                            //request.getInputStream()  = Request 요청 Body 부분에 username과 password가 넘어올 것임 JSON 형식으로
                                                                            //.getInputStream()  = 데이터 가져오기
                                                                            //두번째 파라메터 : 변환할 Object 타입

            //검증, 인증 처리하는 메서드 .authenticate() -토큰을 넣어줘야 함
            return getAuthenticationManager().authenticate( //상속 받아서 사용할 수 있음
                    //토큰 만들기
                    new UsernamePasswordAuthenticationToken(
                            requestDto.getUsername(), //첫번째 값
                            requestDto.getPassword(), //두번째 값
                            null //권한 쪽은 null
                    )
            );
        } catch (IOException e) {
            log.error(e.getMessage());
            throw new RuntimeException(e.getMessage());
        }
    }

    //로그인을 성공하고 수행되는 두번째 메소드
    @Override
    //Authentication authResult : Authentication 객체를 파라메터 받아옴 -> 이 안에는 UserDetails가 들어있음 -> 그 안에 UserDetailsImpl가 들어있음
    //UserDetails와 UserDetailsService를 Authentication Manager이 사용
    protected void successfulAuthentication(HttpServletRequest request, HttpServletResponse response, FilterChain chain, Authentication authResult) throws IOException, ServletException {
        log.info("로그인 성공 및 JWT 생성");
        String username = ((UserDetailsImpl) authResult.getPrincipal()).getUsername(); //(UserDetailsImpl) authResult.getPrincipal() = @AuthenticationPrinciple
        UserRoleEnum role = ((UserDetailsImpl) authResult.getPrincipal()).getUser().getRole(); //토큰 생성시 두번째 파라메터에 넣어주기 위함


        //토큰 만들기
        String token = jwtUtil.createToken(username, role);

        //Cookie 생성하고 Response 객체에 넣어주는 메서드 실행
        jwtUtil.addJwtToCookie(token, response);

    }

    //로그인을 실패했을 때
    @Override
    protected void unsuccessfulAuthentication(HttpServletRequest request, HttpServletResponse response, AuthenticationException failed) throws IOException, ServletException {
        log.info("로그인 실패");
        response.setStatus(401);
    }
}
** DistpatcherServlet
(분배의 역할 - 들어오는 HTTP 요청을 **핸들러(Controller)**로 전달하고, 그 응답을 다시 클라이언트에게 전달하는 역할)
AuthorizationFilter (인가)
JwtAuthorizationFilter
들어온 Jwt를 검증 + 인가(허가) 해줄 것임
Jwt 검증 위해 jwtUtil 및 그 사용자가 있는지 없는지 확인 위해 UserDetailsService (.loadUserByUsername()을 쓸 것 )
package com.sparta.springauth.jwt;

import com.sparta.springauth.security.UserDetailsServiceImpl;
import io.jsonwebtoken.Claims;
import jakarta.servlet.FilterChain;
import jakarta.servlet.ServletException;
import jakarta.servlet.http.HttpServletRequest;
import jakarta.servlet.http.HttpServletResponse;
import lombok.extern.slf4j.Slf4j;
import org.springframework.security.authentication.UsernamePasswordAuthenticationToken;
import org.springframework.security.core.Authentication;
import org.springframework.security.core.context.SecurityContext;
import org.springframework.security.core.context.SecurityContextHolder;
import org.springframework.security.core.userdetails.UserDetails;
import org.springframework.util.StringUtils;
import org.springframework.web.filter.OncePerRequestFilter;

import java.io.IOException;

@Slf4j(topic = "JWT 검증 및 인가")
public class JwtAuthorizationFilter extends OncePerRequestFilter { // OncePerRequestFilter 상속 받으면 HttpServletRequest,HttpServletResponse 받아옴

    private final JwtUtil jwtUtil;
    private final UserDetailsServiceImpl userDetailsService;

    public JwtAuthorizationFilter(JwtUtil jwtUtil, UserDetailsServiceImpl userDetailsService) {
        this.jwtUtil = jwtUtil;
        this.userDetailsService = userDetailsService;
    }

    @Override
    protected void doFilterInternal(HttpServletRequest req, HttpServletResponse res, FilterChain filterChain) throws ServletException, IOException {

        String tokenValue = jwtUtil.getTokenFromRequest(req); //.getTokenFromRequest(req): cookie에서 JWT 가진 쿠키 가져오는 메소드

        //순수 토큰 만들기
        if (StringUtils.hasText(tokenValue)) {
            // JWT 토큰 substring
            tokenValue = jwtUtil.substringToken(tokenValue);
            log.info(tokenValue);

            if (!jwtUtil.validateToken(tokenValue)) {
                log.error("Token Error");
                return;
            }

            Claims info = jwtUtil.getUserInfoFromToken(tokenValue);

            try {
                setAuthentication(info.getSubject()); //info.getSubject() = user 이름 가지고 올 수 있음 - 토큰 만들 때 이름을 subject에 넣어서
            } catch (Exception e) {
                log.error(e.getMessage());
                return;
            }
        }

        filterChain.doFilter(req, res);
    }

    // 인증 처리
    public void setAuthentication(String username) {
        SecurityContext context = SecurityContextHolder.createEmptyContext();
        Authentication authentication = createAuthentication(username); //Authentication 구현체 받음
        context.setAuthentication(authentication);//Authentication 구현체 받은 것을 Context에 넣을 것임

        SecurityContextHolder.setContext(context);//Context를 다시 ContextHolder에 넣음 => 인가된 사용자야 (인증처리 완료)
    }

    //위 인증 처리의 createAuthentication(username);에서 넘어옴
    // 인증 객체 생성
    //userDetail이 필요함 그래서 userDetailsService.loadUserByUsername(username)를 해줌
    private Authentication createAuthentication(String username) {
        UserDetails userDetails = userDetailsService.loadUserByUsername(username);
        return new UsernamePasswordAuthenticationToken(userDetails, null, userDetails.getAuthorities());
        //UserDetails를 사용해서 principle,credentials, 권한 넣는 부분 채움
        //authentication 만들어져서 인증 처리로 돌아감
    }
}
Filter을 만들면 Filter을 등록하고 추가적인 값들도 줘야 함
WebSecurityConfig에서
package com.sparta.springauth.config;

import com.sparta.springauth.jwt.JwtAuthorizationFilter;
import com.sparta.springauth.jwt.JwtAuthenticationFilter;
import com.sparta.springauth.jwt.JwtUtil;
import com.sparta.springauth.security.UserDetailsServiceImpl;
import org.springframework.boot.autoconfigure.security.servlet.PathRequest;
import org.springframework.context.annotation.Bean;
import org.springframework.context.annotation.Configuration;
import org.springframework.security.authentication.AuthenticationManager;
import org.springframework.security.config.annotation.authentication.configuration.AuthenticationConfiguration;
import org.springframework.security.config.annotation.method.configuration.EnableGlobalMethodSecurity;
import org.springframework.security.config.annotation.web.builders.HttpSecurity;
import org.springframework.security.config.annotation.web.configuration.EnableWebSecurity;
import org.springframework.security.config.http.SessionCreationPolicy;
import org.springframework.security.web.SecurityFilterChain;
import org.springframework.security.web.authentication.UsernamePasswordAuthenticationFilter;

@Configuration
@EnableWebSecurity // Spring Security 지원을 가능하게 함
public class WebSecurityConfig {

    private final JwtUtil jwtUtil; //filter에 넣어야해서 주입
    private final UserDetailsServiceImpl userDetailsService; //filter에 넣어야해서 주입
    private final AuthenticationConfiguration authenticationConfiguration;

    public WebSecurityConfig(JwtUtil jwtUtil, UserDetailsServiceImpl userDetailsService, AuthenticationConfiguration authenticationConfiguration) {
        this.jwtUtil = jwtUtil;
        this.userDetailsService = userDetailsService;
        this.authenticationConfiguration = authenticationConfiguration;
    }

    //AuthenticationManager 만들기 - Bean으로 등록
    @Bean
    public AuthenticationManager authenticationManager(AuthenticationConfiguration configuration) throws Exception {
        return configuration.getAuthenticationManager();
    }

    //인증 Filter 등록 + Bean으로 등록하는 메서드
    @Bean
    public JwtAuthenticationFilter jwtAuthenticationFilter() throws Exception {
        //인증 Filter 생성
        JwtAuthenticationFilter filter = new JwtAuthenticationFilter(jwtUtil);

        //JwtAuthenticationFilter에서 getAuthenticationManager()로 가져오므로 set도 해줘야 함
        filter.setAuthenticationManager(authenticationManager(authenticationConfiguration));
        //AuthenticationManager만드는 메서드에 먼저 넣고 그 값을 set해주기
        return filter;
    }

    //AuthorizationFilter
    @Bean
    public JwtAuthorizationFilter jwtAuthorizationFilter() {
        return new JwtAuthorizationFilter(jwtUtil, userDetailsService);
    }

    @Bean
    public SecurityFilterChain securityFilterChain(HttpSecurity http) throws Exception {
        // CSRF 설정
        http.csrf((csrf) -> csrf.disable());

        // 기본 설정인 Session 방식은 사용하지 않고 JWT 방식을 사용하기 위한 설정
        http.sessionManagement((sessionManagement) ->
                sessionManagement.sessionCreationPolicy(SessionCreationPolicy.STATELESS)
        );

        http.authorizeHttpRequests((authorizeHttpRequests) ->
                authorizeHttpRequests
                        .requestMatchers(PathRequest.toStaticResources().atCommonLocations()).permitAll() // resources 접근 허용 설정
                        .requestMatchers("/api/user/**").permitAll() // '/api/user/'로 시작하는 요청 모두 접근 허가
                        .anyRequest().authenticated() // 그 외 모든 요청 인증처리
        );

        http.formLogin((formLogin) ->
                formLogin
                        .loginPage("/api/user/login-page").permitAll()
        );


        //여기까지해도 Filter만 만들어준 거임 =  SecurityFilterChain에 넣어주지 않았기 때문에 끝난게 아님
        //-> SecurityFilter안에 끼워넣어줘야 함 (어떤 순서에 언제 끼워넣을건지 말해주지 않음)
        //아래 두개의 코드가 관련된 내용임

        // 필터 관리
        http.addFilterBefore(jwtAuthorizationFilter(), JwtAuthenticationFilter.class);
        http.addFilterBefore(jwtAuthenticationFilter(), UsernamePasswordAuthenticationFilter.class); //UsernamePasswordAuthenticationFilter : username과 password 확인해서 인증처리
        //.addFilterBefore 해당 filter 전에 내가 넣을 거다 (UsernamePasswordAuthenticationFilter 전에 jwtAuthenticationFilter를 먼저 수행하겠습니다)
        //로그인을 하기 전에 인가하고 인가가 제대로 되지 않았으면 로그인하는 게 올바른 순서라서 jwtAuthenticationFilter가 먼저
        return http.build();
    }
}
세션 대신 JWT 방식 사용하기 위한 설정
  // 기본 설정인 Session 방식은 사용하지 않고 JWT 방식을 사용하기 위한 설정
        http.sessionManagement((sessionManagement) ->
                sessionManagement.sessionCreationPolicy(SessionCreationPolicy.STATELESS)
        );
SessionCreationPolicy 정책을 Stateless로 할 거임 -> JSON 형식으로 들어가던 id값 안 뜰거임
HomeController
@AuthenticationPrinciple을 통해 실제 접속한 사용자의 이름을 보낼 수 있음
package com.sparta.springauth.controller;

import com.sparta.springauth.security.UserDetailsImpl;
import org.springframework.security.core.annotation.AuthenticationPrincipal;
import org.springframework.stereotype.Controller;
import org.springframework.ui.Model;
import org.springframework.web.bind.annotation.GetMapping;

@Controller
public class HomeController {
//메인 페이지에 가기 위해 만듦
    @GetMapping("/")
    public String home(Model model, @AuthenticationPrincipal UserDetailsImpl userDetails) {
        model.addAttribute("username", userDetails.getUsername());
        return "index";
    }
}